Thursday, December 29, 2011

Problem Rooting with CWM 5 HoneyComb

Rooting the Dell Streak 7 with HoneyComb problems with rooting using Superuser7.zip


Placed the superuser.zip in the root of the internal memory, then from CWM5 I can find it but when I select it it gives me the following error:

E: Error in /emmc/Superuser7.zip
(Status 0)
Installation aborted.

If this occurs ... you could try the files below

**** If you have problems with Superuser7.zip Like I will show later.. use the following files they worked for me but..... YMMV only worked for me .. might not for you!!!****

Eclair / Froyo / Gingerbread / Honeycomb / IceCreamSandwich (2.1 – 4.0.3)
md5: a5d14dc42323a61caf71549a885af8c3
Superuser-3.0.7-efghi-signed.zip
binary only
md5: 26d08a253f1883c13561d173094d70b9
su-bin-3.0.3.2-efghi-signed.zip
Kudoo's to ChainsDD

Follow the same procedure as in the Root Dell Streak but using the Superuser-3.0.7-efghi-signed.zip... And every thing worked out wonderfully...

I am fully rooted and using Titanium Back up as we speak...

Good Luck.


Bluetooth Fashion / Function Ring

Fashion Meets Function Bluetooth headset O.R.B

Who Said that communications had to be ugly... People walking around seaming to talk in to thin air till you see that ugly black bug in their ear.. Well now talking to your self has become a fashion at least in concept.

There is nothing about the ring / ear piece being
BlueTooth technology but I'm sure that would be the only tech that could carry the signal. The do Mention "HiWave™ technology, the O.R.B. is a “Digitset™” that provides high-quality bone conduction audio without the discomfort of placing a device inside the ear." But sure its a concept att.


Just looks cool I am sure we are close to this .. as well as implants.. :)

Wireless communication fashion

Just not sure how good I would look with the O.R.B. hanging off of my ear. :)

From the Site
With a simple twist, The O.R.B. transforms from a ring to a headset worn on the ear that is capable of hands-free calling. Incorporating HiWave™ technology, the O.R.B. is a “Digitset™” that provides high-quality bone conduction audio without the discomfort of placing a device inside the ear. A deluxe edition also features an E Ink display for caller ID, text messaging, and calendar reminders.

To use the ring as a headset, simply remove it from the finger and twist open around the hinged joint. The ring (now a headset) is placed over the upper ear, between the ear and the side of the head. The transmitter end of the headset rests just above the jawbone and utilizes dual speaker “voice annihilation” DSP technology. The transmit exciter transducer rests just behind the outer ear.
Size and Fit

The O.R.B. will be available in a variety of sizes, available in styles for both men and women.

All sizes have an expansion hinge, spring prongs and adjustable adhesive soft pads on the interior edge, which provide a secure and comfortable fit on the finger (or thumb) as well as the ear.
Use the O.R.B. Anywhere

The O.R.B. features military-grade seals and gaskets, making it fully waterproof and built to accompany you on any adventure.
How Does the O.R.B. Work?

The ring vibrates, alerting the user to an incoming call, text message, or event reminder. The user can glance down at the finger and see a horizontal streaming message of caller I.D. or meeting schedules. If accepting an incoming call, the user twists open the O.R.B., slips over the ear, and begins the conversation. If declining incoming calls or texts, or dismissing event reminders, the user can simply push the cancel button with the O.R.B. still idle on their finger. When not in use the ring serves as a time device/alarm clock. If the user would like to silence a call he/she can simply touch a button on the band.


Root Dell Streak 7 with HoneyComb 3.2

Root the Dell Streak 7 that came with HoneyComb 3.2 Native It is done ... have Rooted my Dell Streak... I did have to modify the way it was done from the instructions on XDA due to issues with SuperUser7, but Will Provide links to what I used instead..
Followed a good portion of the instructions From XDAdevelopers Props to several folks but mostly to EwanG for their easy to follow instructions link at the bottom of the post.

******Warning ... this could brick your
device render it as a paper weight.. an expensive paper weight... I am not responsible for your Dell Streak 7.. YOU ARE.. I may not be able to provide any help .. what so ever ... due to the fact that I may no longer have the device after a couple of days... Do this at your own risk.. Will void warranty and could cause a nuclear disaster.... :) OH and BTW DON'T DO THIS... I told you not to :) *****


1) this is just me ... but I would down load these file on the Dell Streak 7 directly and use ES File Explore to copy them to the root of the internal SD card (internal memory) ... Download the Fastboot+ADB.zip file for Clockwork Mod 5.0.2.7 from the XDA Developers thread
or from
http://www.megaupload.com/?d=THVTIETF

**** If you have problems with Superuser7.zip Like I will show later.. use the following files they worked for me but..... YMMV only worked for me .. might not for you!!!****

Eclair / Froyo / Gingerbread / Honeycomb / IceCreamSandwich (2.1 – 4.0.3)
md5: a5d14dc42323a61caf71549a885af8c3
Superuser-3.0.7-efghi-signed.zip
binary only
md5: 26d08a253f1883c13561d173094d70b9
su-bin-3.0.3.2-efghi-signed.zip
Kudoo's to ChainsDD


2) Download the Clockwork mod 5.0.2.7 file from the XDA Developers thread or from:
http://www.megaupload.com/?d=YIW1JRY5

3) Go into Settings->Applications on the Dell Streak 7 and turn on "Run Applications from Unknown Sources"

4) Go to Development Settings and select "USB Debugging"

5) Unpack the Fastboot+ADB file into a directory on your computer where you can find it again

Root Dell Streak 7 HoneyComb ADB folder

I put this on my c:\dellroot so I could find it easily enough even when using command line.

6) Attach the Streak to your PC, and copy the "Drivers.zip" file from the root directory of the Streak (/sdcard) to the same directory where you unpacked the Fastboot file ***Ok here is where I ran in to the first problem.. Win XP would also not mount the Dell Streak 7 in usb mass storage so I had to use my MacBook Pro and Android File Transfer to get this part done. :(

7) Turn off your Streak after you have copied this file, and disconnect it from the PC

8) Unpack the drivers.zip file and find the "Setup.MSI" file. Execute this file to install the drivers you will need

Root Dell Streak 7 Setup.msi


****Every thing seemed to install ok... but when I got to the point of Please Plug-in your device ... it would not recognize the Streak at all and kept asking me to pulg it in and finally error out.. just click ok ... should be alright.****

9) Put your Streak into Fastboot mode - i.e. turn it off, then turn it on by pressing the Power button while holding the Vol DOWN (-) at the same time. This can take up to 20 seconds

Dell Streak 7 Root Buttons for Fastboot

10) You will get some red text followed by a white line saying something about Fastboot USB downloading is active


11) Connect the streak to the PC now, and it should install an Android ADB driver. Depending on what you have already setup you may get some drivers installed successfully, and some not. In general if you've been following this guide, you'll be ok (FYI on my Dell D620 I know its old but It took like 10 min to get the drivers and stuff installed all the while it killed my usb mouse and keyboard while it was installing the drivers. Every thing came back and worked just fine but .. want you to know it took for ever on winxp.)

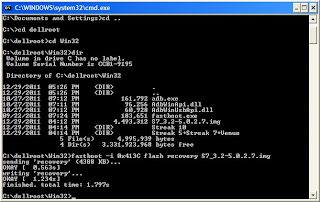
12) Open a command line for the folder where you have fastboot and your recovery image (ClockWorkMod) - in windows navigate to the folder, and hold the shift key while right clicking *** did not do this ... not sure what they were trying to accomplish..*** Prior to doing this I put the S&_3.2-5.0.2.7.img in the same folder as the Win32 files. So everything was in the same directory.. Remember I am Using WinXP Pro so yours may be a bit different. Mine is c:\dellroot\Win32

If I have to tell you this .... You really may want to re-think doing any of this ... but here goes.

to get a command prompt click on start > Run > type in "cmd" (with out the quotes)
This will get you a classic dos (not really dos, but for our purposes that works) command line.

Type in "cd .." with out the quotes and return you may have to do this a few times to get to the root of the c drive till you get to just c:\

Then you want to "cd dellroot" or what ever directory you used.


Dell Streak 7 ADB Directory Root files

Command Prompt Root Dell Streak 7 HoneyComb

13) On the command line type the following:
fastboot -i 0x413C flash recovery recovery.img (where recovery.img is the ClockworkMod or other recovery file)


If you did everything right then you should see.

Fastboot Dell Streak 7 root flash recover finished OKAY

14) On the command line type the following:
fastboot -i 0x413C reboot

Fastboot Dell Streak 7 root reboot


15) Your device should now reboot

16) To get it to reboot into CWM, turn the Streak off, and then turn it on again while holding the Power Button and Volume UP (+) at the same time. This may take up to 30 seconds

From here you would follow the normal CWM options to install just the root files (Superuser7 for one example) or install a custom ROM.

Ok here is where I ran in to troubles.. with the Superuser7.zip file

TheManii over and XDA says to do the following

Copy superuser.zip to SD card
Reboot into streakmod
Select "update from update.zip"
Navigate to superuser.zip
Flash
Finished
Hehehe... not so simple for us that don't develop all the time..

After you use the Power and + to get in to the recovery you will get this

Use the volume buttons to navigate to #2 Software Upgrade via update.pkg on SD card
And press the power button to select it.

once you are in the CWM recovery use the volume buttons to navigate to the install zip from sdcard. (this means internal memory .. not the physical SD card if you have one that will show up as SD card2)


then choose zip from internal sdcard


Then Chose Superuser7.zip


Then confirm the install

Yes -


If you are lucky everything went fine and just select go back till you find the reboot and select it and your are rooted...

But..................

If you get

E: Error in /emmc/Superuser7.zip
(Status 0)
Installation aborted.

Your Screwed.... :) not... Click here to fix E: Error in /emmc/Superuser7.zip

Check out the instructions on the original thread over at XDA. Root the Dell Streak 7 Here


Dell Streak 7 Honeycomb and Mac OSX

Dell Streak 7
Picked up a cheap Dell Streak 7 brand new in the box (sealed) yesterday with HoneyComb 3.2 pre-installed.. Let me just say this is an awesome fast 7 inch android tablet with the 1GHz Dual Core nVidia Tegra T20 Processor. There are some design issues I am not exactly happy with but on the most part I am very pleased with it. This was picked up due to some issues with the Pandigital SuperNova that I will cover later (unfortunately it was a present and is out of town with the person I bought it for so troubleshooting will have to be next week>).

Setting up the Dell Streak 7 was
a breeze no real hacking or moding required seeing that the big G has blessed this tablet for market and all of the Google apps.

Will Root the Dell Streak 7 Click here for the post in a bit and let you know how that process went.

But for now I just wanted to hook the Dell Streak up to my MacBook Pro running OSX and came to a sad realization. Natively OSX will not discover the Dell Streak 7.

I find this very odd due to a couple of things.

First off Android on the Dell Steak 7 and Mac OSX are both variants of *nix.

Second any other Android I have hooked up to the Mac OSX just work in USB storage mode.

So to temporarily fix this issue I had to down load androidfiletransfer.dmg and install it you can get the files from here androidfiletransfer.dmg once the dmg is installed you can see your Dell Streak 7 in Mac OSX but you must use the program to transfer files. Byte me Dell

Dell Streak 7 on Mac OSX

Sunday, December 25, 2011

Pandigital SuperNova won't boot up

Pandigital stuck on battery charge or supernova stuck on boot up screen.

Or Panditigtal SuperNova bricked.

This should help even if you have not rooted or added Android Market to your Pandigital SuperNova and are having problems.

If after the Market hack or tying to Root the Pandigital SupeNova and it will no boot up for some reason ... you may try this I am not sure if it will work because every thing went fine for me ... but

This fail safe is built in and you can start it by starting up the Pandigital SuperNova and shutting it down before Android actually starts up ... you have to repeat this process at least 3 to 5 times before the fail safe firmware re-flash kicks in but eventually it will.

Fail Safe for bricked Pandigital SuperNova.

Kairnage over at SlateDroid got in contact with Pandigital and wrote this

"Recently when I was having issues with a mod killing my Supernova while I was trying to fix it the system seemed to restore itself without having a restore image on the device and to a revision that was not among the ones I had downloaded. When I requested information about it from Pandigital I was ignored.

Today I called and pretended to have a bricked tablet. I said I had bought ten for Christmas gifts and was going to return them all if they could not fix it. After the usual "What have you done to it?" questions the tech asked me how many times I had powered down the device. I told him twice. He asked me to try it one more time. I pretended to that suddenly the system was restoring. After he said to wait for it to boot I said I didn't have any restore files on the pad because I had just opened it. He explained that some of the Pandigital line have a "boot error count". He said he wasn't sure if it was 3 or 5 but basically after the system registers a failed boot it begins a count. If it hits the determined number without booting it will fall back to the firmware installed at the factory.

He said that is how they determine if a tablet is truly bricked, having the customer power on, wait 2 or 3 minutes, repeat at least 5 times. If it doesn't boot or start to restore they have them send the unit back."

Wednesday, December 21, 2011

Install Android Market Pandigital SuperNova

So you want Android Market on your Pandigital SuperNova??

It Works Android Market is now installed on the SuperNova!!! This was done on IR80_S_BN_W_A_A_09282011 with no OTA updates... YMMV Remember do this at your own risk!!!


** You should also be able to remover Market or reset the the Pandigital SuperNova by going in to Settings > Privacy settings and press Factory data reset. if you don't want root any more after doing this process. This should wipe every thing (including apps and personal data so back up what you need) and put the SuperNova back to the way it was out of the box.***

Or check
Fail Safe for bricked Pandigital SuperNova. for possible recovery of Stuck on boot or battery.

**** As usual here is your sign...

Warning Not responsible

for your tablet you are ... you could brick your Pandigital SuperNova doing this and you could also void your warranty... I am not responsible for what you do... ****


This will get Market running
on the SuperNova, you may not get all of the apps that you want due to the fact that the SuperNova has not been blessed by the Big G... You may be able to hack the Market Build.Prop file after rooting and gain more apps but I am not even sure spoofing the Android Market like that will work.

Download The G Tablet.zip

And copy over to your Pandigital SuperNova. I copied it on to the SD card in the download folder.


Optionally you can down load this file
Vending.zip They say it is a newer version of the Android Market but I have not gotten this one to work just yet..

Using the Built in ES File Explorer navigate to where you saved the G Tablet.zip file long press and it will bring up a context menu where you can chose Extract to. Just leave the default G Tablet/ and click ok


Donations are always accepted


Then you can Go in to the G Tablet folder then app folder. And you will see the .apk's you need to install.

**** Warning do it exactly this way read first the read again and do :) *****

Install files in this order:

onetime initializer
setup wizard
google services framework.
Gmail
Talk
Maps

THEN Market (Which is the Vending.apk); after installing market DO NOT OPEN. after install, immediately POWER OFF
after new power up push "use by default this action": press Launcher
launch market. follow prompts to setup account. (I used account linked to my phone)
Done! And No, I didn't have to do any kind of a factory reset


Thanks to Edge310 over at SlateDroid and daprospecta at androidtablets
Here is a link to the thread over at androidtablets


Root Pandigital SuperNova

Pandigital SuperNova Root
Rooting the Pandigital SuperNova fast and easy using GingerBreak v1.2. This 8" Android Tablet is the bomb straight out of the box fast great capacitive touch screen ready to rock and roll with Amazon Appstore (download required) GingerBread Android the Pandigital SuperNova will be a great gift to someone that does not want to carry around the heavy bulky laptop for light internet surfing, social media, music, and movies.

****

Warning

At this time you may not be able to un-Root until a new Firmware is pushed out by Pandigital but you can try to un-root or reset the the Pandigital SuperNova by going in to Settings > Privacy settings and press Factory data reset. if you don't want root any more after doing this process. This should wipe every thing (including apps and personal data so back up what you need) and put the SuperNova back to the way it was out of the box.****

**** As always Not responsible for your tablet you are anything you do here could brick your android tablet and / or void the warranty... Use at your own risk ****

If you do get in to a bad spot ... may be no help but check this post.
Fail Safe for bricked Pandigital SuperNova. for possible recovery of Stuck on boot or battery.

First thing you will need to do is grab GingerBreak HERE link off XDA Kudoos to Chainfire over at XDA for GingerBreak TKS.


Now here is the trick
you need to get the GingerBreak.apk on the internal memory of the Pandigital SuperNova because during the scripts and things going on with GingerBreak your sd card will dismount. And you must also have a formated sd card in during the process, it will reboot during the root process as well.

I just plugged the Pandigital SuperNova in to my Mac and turned on USB storage

Pandigital SuperNova Root

Donations are always accepted


Pandigital SuperNova Root

Pandigital SuperNova Root

Copied the GingerBreak.apk over to the download on the internal memory of the Pandigital SuperNova.

Eject the storage from the Mac and I'm ready to go.

Make sure USB debugging enabled on your device Settings > Application settings > Development.

Make sure you have an SD card (formatted and) inserted

Get the APK on the phone somehow, and install it (see above)

Open the APK, press the root button (should be in your menu now)

Pandigital SuperNova Root

Wait a few minutes. If there are no problems, the device will reboot (note that the
reboot itself can take like 10 minutes due to cache wipe)

Make sure the Superuser app is install and working

Donations are always accepted


Pandigital SuperNova Root SuperUser


Optional: Install BusyBox from Market (I personally prefer the stericsson installer)

(How To Install Market on the Pandigital SuperNova in the next post)

Optional: Uninstall GingerBreak, you don't need it on your SuperNova anymore

And you are rooted. Go get Titanium Backup and start playing around with things.


Here is more info from XDA on the GingerBreak APK

Donations are always accepted


Android Pandigital Planet Easy Market and Root

SPz0 over at SlateDroid has updated the OpenRom to v2.0 have not tried it yet .. Just so you know. :)
Pandigital Planet Market and Root
This Hack will get Android Market and will root your Pandigital Planet. And will speed it up so fast you would think you paid much more for it.

I have been playing with the Android Pandigital Planet for the last few weeks and to be honest it is an amazing little 7 inch tablet. Now mind you it is a resistive touch screen and it does have its little quirks but has been one of my primary devices for web surfing, reading books, Google+, and email since I have owned it. For this reason I have decided
to get the Pandigital SuperNova for my daughter for Christmas ... more on that later.

Also if you want to ROOT your Pandigital SuperNova follow me here...

So two things are key here you need to have on of the new Pandigital Planets for this to work. The back of the box should have the new getjar application instead of the the older application. This will be the first clue that this flash will work for you.

The other thing to watch out for is:
This ROM is ONLY FOR THE PDP REFRESH RUNNING 2.3.4 (Gingerbread) NATIVE!!!!

Spz0 over at slatedroid came up with this and get's all the kuddos for it. Follow the directions carefully and as always **** NOT responsible for bricking / rendering your tablet unusable... and this could void your warranty.*******

OpenPDP-2.3.4 ROM v1.1-BETA Update!
===================================================================
FOR ANDROID 2.3.4 ONLY!
Lets be clear here...

This ROM is ONLY FOR THE PDP REFRESH RUNNING 2.3.4 (Gingerbread) NATIVE!!!!

This ROM WILL NOT WORK on the Older PDP Tabs running 2.2.1 (Froyo) Native!!! If you install this ROM on a 2.2.1 device YOU MAY BRICK YOUR TAB!!!


This is a BETA release, meaning this ROM has had minimal field testing, so you all are my guinea pigs. I have tested this ROM myself, and it seems solid, but as always, Download at your Own Risk, and make sure you have a backup of the stock firmware!!!!
===================================================================

Some Features Include:

-Pre-Rooted
-Google Experience PreLoaded
-Bloatware Removed
-NewShiny UI
-System Tweaks and performance Improvements
-OpenPDP Customs Apps and Settings
-New VTL 1.5-Beta Launcher
-USB Debug enabled by default


Disclaimer:
I take no responsibility for Bricked PDP's! Flash at your own risk!
PLEASE READ INSTRUCTIONS CAREFULLY AND FOLLOW TO THE LETTER!!
Keep in mind that this WILL ERASE your data and cache! So back your apps up!

Instructions for OpenPDP-2.3.4 ROM!

Download zip file to your SDcard
make sure there are no other update zips on your sdcard, including official updates!
Shut down the device.
Boot to Recovery. (Vol. up + Power for 3 sec)
Push Vol. Up until "Apply update from SDcard".
Push Vol. Up until you have the update highlighted.
Push Vol. Down to apply update.
Reboot once flashed. (push Vol. Down from recovery menu)
Profit!!


Download OpenPDP ROM HERE.

OpenPDP-2.3.4-v1.1-BETA-Spz0.zip

**note: Spz0 has removed the HDMI Switch app from the ROM, due to the fact that they just sit in RAM. If you wish to retain these, I have provided the separate APK file, located below. Just Sideload it as you would any other installable App.


If you need more info follow Spz0's thread here
[12/21/2011]
Version 2.0 Changes:

Based on 12/02 fw.
Go-Launcher integration
Netflix pre-loaded.


Tuesday, December 6, 2011

HTC Incredible Root with Unrevoked ??

HTC Droid Incredible Root With the Unrevoked3 ... will not work if you have done the current OTA 4.08.605.2 for Gingerbread 2.3.4.

"failed to get root. Is your firmware too new ...‎"

I have tried just straight running the program and following the instructions on XDADevelopers as follows Thanks scotty1223.. BTW I am using a MAC to Root the HTC Incredible and modifyed the instructions just a bit to suit my set up ..

I am again not responsible for your phone or your actions... Do this at your own peril ...

1)download these files,and save them somewhere you can easily find them:

unrevoked 3.22 unrevoked 3.22
md5: 5760fbe8ed6d44752e78433252f2d5b2

unrevokeds modified usb drivers public:windows_hboot_driver_install [RootWiki]


mini-adb_inc(contains misc image,flash image,and some basic adb tools)Multiupload.com - upload your files to multiple file hosting sites!
md5: a793cc0142e1cd18f60849894bbc47cd

PB31IMG for 2.2 PB31IMG.zip
md5: 31bb1611a0fa8197d447c0438426717e

clockwork 5.0.2.0 Multiupload.com - upload your files to multiple file hosting sites!
md5: e8ac35ddc1c37000bb0852d1f380b5bb

**make sure to check the md5 sums match those listed!**
if you dont have an md5 sum verifier on your PC,there are many out there for free. heres an example: Home of the MD5summer

2)root with unrevoked 3.22
-open the recovery-clockwork-5.0.2.0-inc_PB31IMG download. extract it first if you need to. inside there is an image called "recovery-clockwork-5.0.2.0-inc". right click on this image,then click "copy". navigate to a directory you can easily find it,then right click in that directory,then "paste". alternatively,you can drag it from the extracted folder to a convienient spot(i personally like to drag files around,but its fine either way).
-use your md5 summer to verify the md5 of just the image,not the whole .zip. it should be: ea382ca5809cb872d0582aa22741d592
-install the drivers as described on unrevokeds page above.
-place your phone in charge mode,and make sure usb debugging is checked ON in settings/applications/development.
-extract the contents of the unrevoked 3.22 .zip. open the folder, right click on "reflash" and run as administrator if possible.
-click on "file" in the corner of the relfash window
-click custom recovery
-navigate to,and select your "recovery-clockwork-5.0.2.0-inc" image and select it. at the bottom of your reflash app window, it should now say "recovery:custom" and "waiting for device"
-plug in your phone,and assuming you installed the drivers correctly,unrevoked 3.22 will start. let it do its thing. it will reboot a couple of times. when its finished,it may leave you on a blank screen. if this is the case,pull the battery and reboot.
-you should now have the superuser app in your app drawer. if so,go to settings/applications/manage apps/superuser and clear data. test that superuser is working and granting permissions by downloading rom manager,and using it to flash the newest clockwork recovery. alternatively,download and run a "root checker" or any of your favorite "root only" apps and make sure they work.
-once you get "successfully flashed clockwork recovery" boot to it and make a backup,since downgrading to get s-off WILL wipe all your data. boot back into the operating system.
*special note to slcd users: this version of unrevoked is installig an old, non-compatible version of clockwork,so you will just see a black screen if you do not install newer clockwork as described above.
-if you plan to install a custom rom after downgrading,now is a good time to download titaium backup,and its pro key(WELL worth the $$) and do a batch backup of all your user apps and app data(no system data)

*at this point,you could just enjoy root access without doing anything else. if all you care about is using a couple of root only apps,and deleting some bloatware,you can remain rooted and s-on if youd like. id personally reccomend to downgrade and become s-off in case future OTAs knock out your root access.


then you could try the other ROM's and S-Off if you can get this to work I could not ... Good luck ... and let me know if you do get it to work.


Lone Star Custom Lapel Pins

Lone Star Custom Lapel Pins
Veteran Managed Lone Star Pins are creators of custom lapel pins. We offer a free digital how to PDF on our site, Free Artwork, and quote. Contact us today for your proof and quote.

Share

Twitter Delicious Facebook Digg Stumbleupon Favorites More